Thursday, 31 May 2012

The Pandan Project - Part 1

When you have lived overseas for a long time there will be some things that you will inadvertently miss about home ... family, friends and food that was once part and parcel of your life. One of these which I have often long for since I left home is the Pandan Chiffon Cake. You can get Pandan Chiffon Cakes in England but you have to go down to Chinatown in London and as I don't live anyway near London that's pretty much out of my reach. Yeah yeah I can take the train but that's going to cost a bit and as much as I miss Pandan Cake I'm not that desperate to spend so much money on train fares to satisfy my cravings ... honestly! :) Of course baking it is an option but ... I've never had luck with Chiffon Cakes and besides I couldn't find any Pandan Paste or Pandan Leaves (also known as screwpine leaves) down at the Chinese Supermarket in Sheffield. However through a stroke of luck I happened to discover that there was an asian store in Doncaster and so persuaded my hubby to go there one Saturday so that I could 'kaypo' (nose) around just to see what they stocked. I was in the shop out of curiousity and wasn't looking for anything in particular so it was an unexpected surprise that while browsing through some shelves I found the pandan paste! Yippee!

There is a SE Asian Cooking FB group which has loads of recipes and one of the members had posted a recipe of the 'Never Fail Pandan Cake Recipe' by Betty Saw. Having seen some of the successful attempts by the members of the group inspired me to have a go at making my own. Remembering all my failed attempts at chiffon cake baking I was skeptical if mine would turn out alright. But much to my surprise and delight it did! The recipe was truly a 'never fail'. ;)

First attempt at making Pandan Chiffon Cake

A slice of Pandan cake for D

 The Recipe


  • Ingredients
    7 large egg whites
    150 gm castor sugar
    ½ tsp cream of tartar
    7 egg yolks
    150 gm castor sugar

    Mixture A
    6 tbsp corn oil
    ¼ tsp cream of tartar
    2 tbsp pandan juice (or ½ tbsp pandan paste)
    1 tsp vanilla essence
    125 ml/½ cup thick coconut milk

    150 gm self-raising flour

    Procedure
    Whisk egg whites, sugar and cream of tartar in a electric mixer until stiff and mixture holds its shape.

    In a separate bowl, whisk egg yolks and sugar until light and creamy. Stir in Mixture A. Sift in self-raising flour and fold gently. Pour egg yolk mixture into egg white mixture and carefully mix gently and evenly.

    Pour into an ungreased 23 cm tube pan and bake in a moderate oven (175 C/340 F) for 45-50 minutes until lightly browned on surface. Remove from the oven and invert mould immediately. Allow to cool thoroughly before removing from pan.

The kids love this cake and I was glad to share a bit of 'Singapore' with them. D especially seem to have fallen in love with this lovely, soft and velvety green cake and kept asking me to make some more. Hmmmm ... I'll have to think about that!!!

Wednesday, 30 May 2012

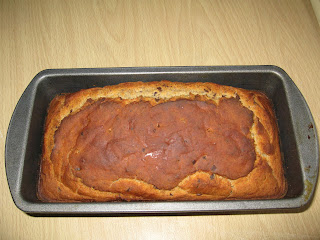
Banana Chocolate Chip Bread (Egg Free, Gluten Free and Diary Free)

Had 3 ripe bananas left over from our weekend trip to Filey. Was think of making a gluten free banana cake when I came across this recipe. It looked easy and fuss free. Just the kind of recipe for a busy mum of two rascals! I modified it a little using whatever ingredients I had on hand. 

Just out of the oven

The brown bits are cacao nibs which give the bread a lovely nutty flavour

The Recipe


Ingredients
65g Stevia Blend
2 tbls Maple Syrup
70g Cashew Nut Butter
250g Plain Gluten Free Flour*
4 tsp Baking powder
1/4tsp Bicarbonate of Soda
1/4tsp salt
3 mashed bananas
5 tbls almond milk
20g cacao nibs
20g vegan dark chocolate (gluten and diary free)* -chopped into small pieces

Method
  1. Combine all the ingredients (except milk) and mix.
  2. Add milk and mix well.
  3. Grease loaf tin and bake in pre-heated oven at 180C for 45/50 mins or until a skewer comes out clean.
  4. Cool for 20/30 mins.

 *Dove's Farm Gluten Free Flour Blend, Kinnerton Luxury Dark Chocolate (nut free, dairy free, gluten free and egg free)

Chickpea Chocolate Cake

Who would have thought that the humble chickpea would make a great chocolate cakes? I certainly didn't. It most definitely isn't a usual ingredient that one would find in cakes! I was a bit of a skeptic when I first saw the recipe. I'm not exactly a fan of chickpeas but nevertheless decided to give it a go and I've been a convert ever since. And the best thing about it is that my kids absolutely LOVE it! Who would have thought that they would love chickpeas. It's such a novel way of getting some protein into my kids' diet.
This was the cake we had for our Easter tea.


The inside of the cake was nice and moist!
The kids enjoyed the cake so much that I decided to make another one for J's 2nd Birthday. Only this time I used vegan dark and white chocolate (by Organica) for the ganache so that it was totally diary free. It turned out really nice too!
J's birthday cake decorated with his favourite fruits

The Recipe

I got my inspiration from these websites: all recipes and chickpea recipes and adapted them to be more sugar and dairy free. 

Ingredients
460g chickpeas (drained weight)
4 eggs
1 tbsp vegetable oil
75g stevia blend (pure stevia extract blended with erythritol)
2 tbsp maple syrup
2g baking powder
20g ground almonds
20g cacao nibs
1 tsp almond extract
60g dark chocolate (G&B's 72% dark cooking chocolate)
120g milk chocolate (G&B's 37% milk cooking chocolate)

Ganache
250ml Coconut Cream (can also use Oat cream)
200g chocolate (30g milk chocolate, 110g dark chocolate, 60g cacao butter)
1 tsp almond extract (optional)
15g stevia (optional)
2 tbsp maple syrup (optional)

Method
  1. Heat oven to 170C. Lightly grease cake tin with oil.
  2. Blend chickpeas, eggs and oil until smooth. If the blender is big enough add the rest of the dry ingredients and blend. Otherwise pour the chickpea mixture into a mixing bowl and mix the rest of the dry ingredient. Melt the chocolate and add to mixture. Mix well.
  3. Pour the cake mixture into the tin and bake for about 40 mins or until skewer comes out clean. Cool cake before taking it out of tin.
  4. Prepare Ganache: Put the chocolate, almond extract, stevia and maple syrup into a bowl. Heat the cream and pour the hot mixture over the chocolate. Mix until it is smooth. Cool the mixture until it quite thick (thin enough to pour but thick enough not to be free flowing). Pour it over the cake mixture.

N.B
Maple syrup is optional. I only use it because it helps to mask the 'medicinal' taste of stevia which while not unpleasant just tastes weird if you're not used to it.
For the ganache it is not necessary to use a mixture of chocolate. I only use a mixture as I didn't have enough dark chocolate. And can leave out the stevia and maple syrup too. 

Tuesday, 29 May 2012

A new adventure

It's been a long while ... a very long while since I updated this blog. So many things have happened in between since I last penned that last post. For one thing D is now 3 going on 4, a child with pretty much a mind of his own. 

In the first two years D was a good eater, ate almost everything that was sat before him and yes even spicy singaporean food. However as he got older he has become more and more fussy though he still does like his curries! Last year he had a bad case of eczema which lasted for months! The creams which the doctors prescribed didn't help very much. So I started reading up on eczema and the more I read up about the subject convinced me that to keep his eczema under control we had to have a change in his diet. It seems that eczema can be triggered off by gluten, sugar and diary ... all the stuff which D loves. Changing D's diet wasn't going to be a problem the challenge would be getting him to eat it. 

I didn't want to deprive D of all the stuff he loves but there must be ways to make them healthier. So I started researching into healthier alternatives for gluten/wheat, sugar and diary and in the process I've discovered a whole new insight to cooking and baking. Being a trained chemist I relish the prospect and challenge of using unconventional ingredients in traditional recipes. It has certainly made my life and that of my family's very interesting. So hence I've decided to revive this blog so that I can document and share some of my crazy cooking adventures ...  who would have thought a former laboratory rat now turned into a kitchen rat! :)